Step by Step Guide to Building Your Own Fiber Laser Cutter
You can build a fiber laser cutting machine step by step and gain real control over your project. Many choose this path for cost savings, hands-on learning, and the ability to customize every part, from the Laser Source and Laser Head to the Control System and Laser Chiller. DIY builders often enjoy upgrading their machines over time and selecting the best Laser Parts for each job. Pendstar Laser supports you with expert advice, making the process accessible and rewarding.
Key Takeaways
- Always prioritize safety by wearing proper protective gear and setting up a clean, well-ventilated workspace before building or operating your fiber laser cutter.
- Plan your machine based on the materials you want to cut, choosing the right laser power and components to match your cutting needs.
- Assemble the frame and motion system carefully to ensure accuracy and smooth operation, taking time to level and align all parts precisely.
- Install and maintain cooling, gas, and electrical systems properly to keep your machine running efficiently and prevent damage.
- Regularly calibrate, test, and maintain your fiber laser cutter to achieve precise cuts, extend machine life, and improve performance over time.
Safety and Preparation

Laser Safety Basics
Before you start building your fiber laser cutter, you must understand the main safety risks. Fiber lasers can cause serious injuries if you do not follow proper precautions. The table below shows common hazards and how you can protect yourself:
| Safety Risk | Description of Hazard | Key Protective Measures |
|---|---|---|
| Eye and Skin Injuries | High-intensity laser radiation can harm your eyes and skin. | Wear laser safety goggles, use protective clothing, and install shields to block scattered beams. |
| High Temperature and Fire | The laser generates heat that can ignite flammable materials. | Keep your workspace free of flammable items, have a fire extinguisher nearby, and use temperature sensors. |
| Electrical Hazards | High voltage parts can cause electric shock or fire. | Inspect electrical systems often, use certified equipment, and get safety training. |
| Inhalation of Fumes/Particles | Cutting creates smoke and fine dust that can harm your lungs. | Use ventilation systems, wear masks, and check air quality regularly. |
| Harmful Gas Exposure | Some materials release toxic gases when cut. | Avoid cutting hazardous materials, improve ventilation, and use gas detectors. |
| Mechanical Injuries | Moving parts can pinch or cut fingers and hands. | Follow safety rules, use emergency stops, and keep guards in place. |
| Laser Radiation Protection | Laser radiation can harm organs even without direct contact. | Use warning labels, choose lower power when possible, and get regular health checks. |
Tip: Always read the safety manual for your laser system before you begin.
Workspace Setup
You need a safe and organized workspace to build and operate your fiber laser cutter. Follow these steps:
- Leave at least 3 feet of space around your machine for easy access and emergency shut-offs.
- Place the cutter on a stable, level, and non-flammable surface.
- Install a strong ventilation system to remove fumes and dust.
- Connect your machine to a dedicated, grounded electrical circuit.
- Keep the area well-lit but avoid direct sunlight on the machine.
- Control humidity and dust to protect both you and your equipment.
- Clean up dust and debris often to reduce fire risk and improve efficiency.
A clean and well-ventilated workspace keeps you safe and helps your machine last longer.
Personal Protective Equipment
You must wear the right personal protective equipment (PPE) every time you work with a fiber laser cutter. The table below lists the main types of PPE and their uses:
| PPE Type | Purpose/Protection Provided | Specific Recommendations |
|---|---|---|
| Eye Protection | Shields your eyes from laser radiation | Use certified laser safety glasses with the correct wavelength rating. |
| Skin Protection | Prevents burns and heat damage | Wear heat-resistant clothing, gloves, and shoes. |
| Respiratory Protection | Protects your lungs from fumes and dust | Use masks or respirators with filters; change filters regularly. |
| Coveralls, Head Covers, Face Shields | Blocks contaminants from skin, hair, and clothing | Use for high-power lasers or when cutting hazardous materials. |
| Gloves | Guards against burns, cuts, and chemicals | Use leather gloves for heat, rubber gloves for chemicals, and always power down before maintenance. |
Never skip PPE. Even a quick job can expose you to serious hazards. Stay protected every time you use your machine.
Planning and Components
Define Cutting Needs
Before you start to build a fiber laser cutting machine step by step, you need to define your cutting needs. Consider these important factors:
Material Characteristics
- Thickness: Thicker materials need more laser power and slower speeds.
- Composition: Metals like stainless steel and aluminum react differently to the laser.
- Surface Roughness: Smooth surfaces allow faster, cleaner cuts.
Auxiliary Gases
- Oxygen increases speed for carbon steel but may cause rust.
- Nitrogen prevents rust and gives cleaner cuts for stainless steel and aluminum.
- Gas pressure affects both speed and quality.
Laser Power and Speed
- Higher power means faster cutting, especially for thick or dense materials.
Machine Setup
- Proper calibration and cutting head height are essential.
Maintenance
- Regular cleaning and alignment keep your machine efficient.
Tip: Write down the types of materials and thicknesses you plan to cut. This will help you choose the right components.
Select Key Components
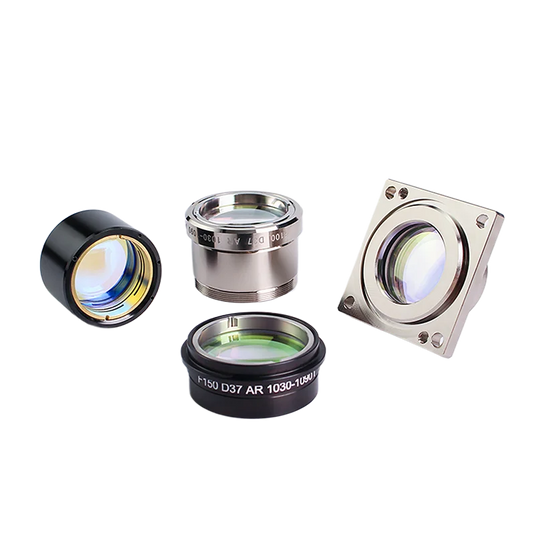
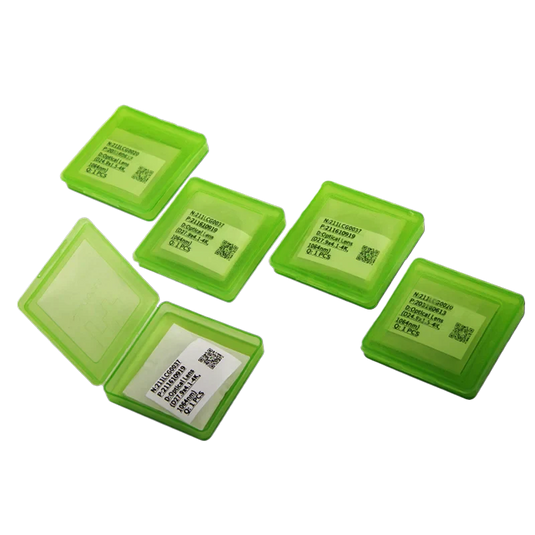
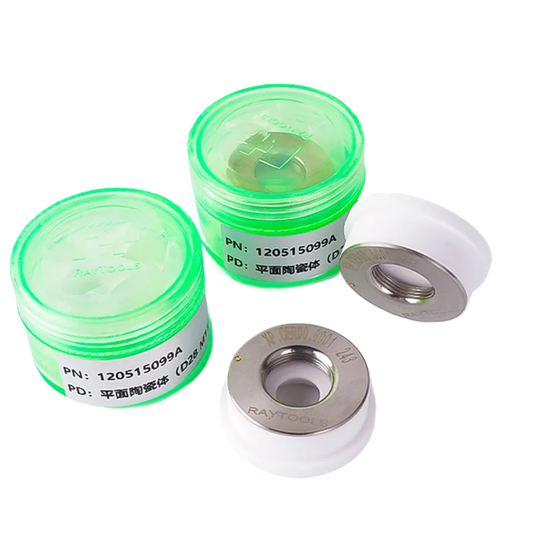
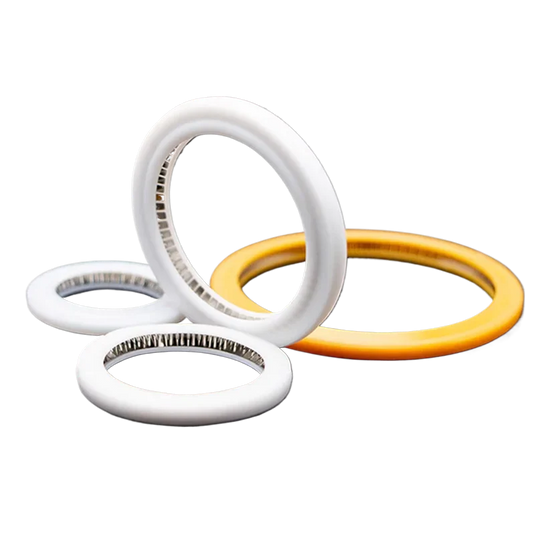
You need several main parts to build your machine. The table below shows the most critical components and their typical costs:
| Component/Consumable | Description/Notes | Typical Cost Range |
|---|---|---|
| Laser Source | Main power for cutting | Varies by power/brand |
| Cutting Head | Focuses the laser, includes lenses | Cost varies |
| Control System | Runs the machine and software | Varies |
| Protective Lens | Needs regular replacement | ~$2 per piece |
| Nozzle | Directs gas and laser | ~$2 per piece |
| Ceramic Rings | Insulates and protects the head | ~$5 per piece |
| Air/Gas Filters | Keeps air/gas clean | $2,000 - $4,000 |
| Dust Collector Filters | Removes dust and smoke | $800 - $2,000 |
| Air Compressor | Supplies assist gas | Varies by power |
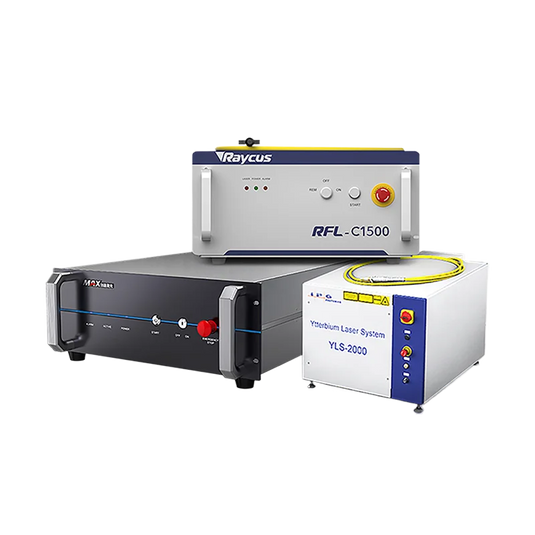
Pendstar Laser supports you in selecting each part, including trusted brands like Raycus and Maxphotonics.
Choose Configuration for 1500W / 3000W / 6000W
You must match your machine’s power to your cutting needs. Use this table to guide your choice:
| Laser Power (W) | Configuration Type | Cutting Capability (Material & Thickness Range) | Cutting Head | Laser Source | Cutting Software | Chiller |
|---|---|---|---|---|---|---|
| 1500 | Cost-effective | Stainless Steel 1-4mm, Carbon Steel 1-10mm, Aluminum 1-2mm | BT220 (Manual Focusing) | Choose from Raycus, Max | XC3000 | S&A |
| 1500 | High-end | Stainless Steel 1-4mm, Carbon Steel 1-10mm, Aluminum 1-2mm | BS03K (Auto Focusing) | Choose from Raycus, Max | XC3000 | S&A |
| 3000 | Cost-effective | Stainless Steel 1-6mm, Carbon Steel 1-16mm, Aluminum 1-4mm | BS03K (Auto Focusing) or BM110 (Auto Focusing) | Choose from Raycus, Max | XC3000 | S&A |
| 3000 | High-end | Stainless Steel 1-6mm, Carbon Steel 1-16mm, Aluminum 1-4mm | BLT310 (Auto Focusing) | Choose from Raycus, Max | FSCUT2000E (enhanced stability and optimized interface) | S&A |
| 6000 | Cost-effective | Stainless Steel 1-10mm, Carbon Steel 1-20mm, Aluminum 1-10mm | BM06K (Auto Focusing) | Choose from Raycus, Max | XC3000Plus | S&A |
| 6000 | High-end | Stainless Steel 1-10mm, Carbon Steel 1-20mm, Aluminum 1-10mm | BLT421 (Auto Focusing) or BS06K (Auto Focusing) | Choose from Raycus, Max | FSCUT4000E (enhanced stability and optimized interface) | S&A |
A 1500W machine works well for thin sheets. For thicker or faster cuts, choose 3000W or 6000W. Pendstar Laser offers expert advice on configuration and compatibility.
Auxiliary Systems
Auxiliary systems keep your fiber laser cutter running smoothly and safely. You should include:
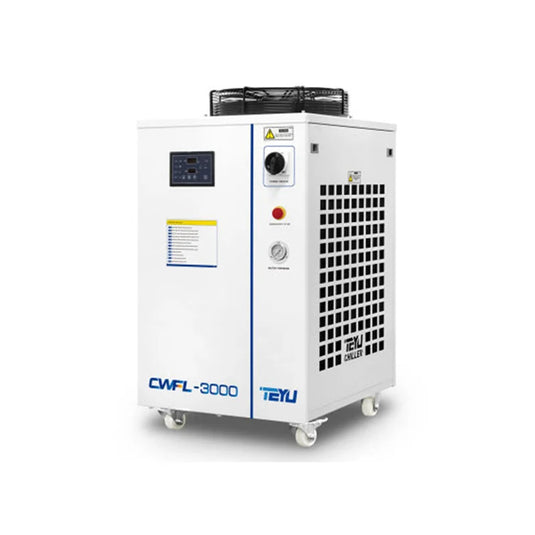
- Water chiller: Cools the laser and optics.
- Gas supply system: Delivers oxygen or nitrogen for clean cuts.
- Air compressor: Provides assist gas.
- Air dryer and filter: Keeps air clean and dry.
- Dust and fume extractor: Removes smoke and dust.
- Voltage stabilizer: Protects electronics from power surges.
- Z-axis slide and servo pack: Controls cutting head movement.
- Electrical kit: Ensures safe wiring and connections.
Clean, cool, and dry air protects your machine and improves cutting quality. Pendstar Laser provides detailed guidance and support for all auxiliary systems.
Build a Fiber Laser Cutting Machine Step by Step

Frame Assembly
You start your project by building a strong and level frame. The frame supports every other part of your machine, so accuracy here is critical. Follow these steps to assemble the frame:
- Unpack all frame parts and install the supporting feet.
- Use bolts, nuts, or rivets to connect the frame pieces according to your design drawings. Tighten all connections securely.
- Place a spirit level on different parts of the frame. Adjust the feet or add shims until the frame is perfectly level on both the X and Y axes.
- Check that all corners are at right angles using a try square. For rectangular frames, measure both diagonals. They should be equal to confirm the frame is square.
- Attach the docking platform to the main bed and adjust its level.
- Install the beam, motor, tank chain, and both X and Y axes.
- Connect signal lines to the control box, oil pump, and emergency stop button.
- Mount the display screen.
- Use the lead pendant to check and adjust the parallelism between the pipe cutter and the main bed.
- Connect voltage stabilizer cables and measure the voltage.
- Adjust the Y axis height as needed.
- Make sure nothing blocks the machine’s movement. Return the machine to its original position.
- Shut down the computer and turn off the main switch.
Tip: Take your time during frame assembly. A level and square frame prevents noise, jamming, and damage during operation.
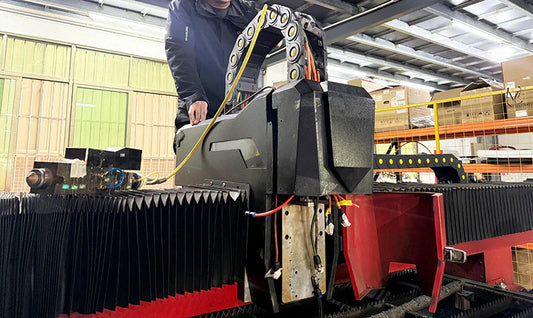
Motion System Installation

The motion system moves the cutting head with speed and precision. You need to install it carefully to ensure reliable performance.
- Choose high-quality, compatible components for the motion system. Even the best servomotors can underperform if you use poor connectors.
- Build a simple, compact, and rigid motion system. This reduces vibration and improves accuracy.
- Use vibration isolation pads or air bladders under the machine to dampen ground vibrations.
- Place motors close to the center of the moving platform. This reduces errors from torque and geometry.
- Install direct measuring encoders for precise feedback.
- Keep the work area clean. Dust and debris can affect precision.
- Regularly inspect and maintain drive systems, cooling, and electrical parts.
- Follow ISO 2768 or similar standards for dimensional and geometric tolerances.
- Calibrate the system after installation. Use external tools like laser interferometers for error mapping if possible.
Note: Clean optics, lenses, and mirrors with lint-free cloths and optical-grade solvents. Handle all parts gently to avoid scratches.
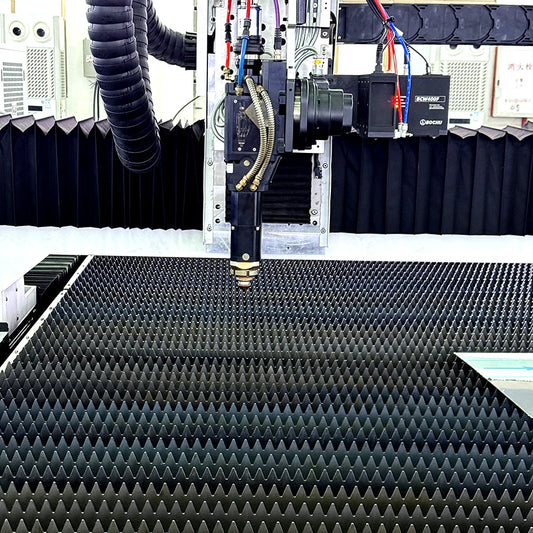
Laser Source and Cutting Head

You now install the heart of your machine: the laser source and cutting head. This step requires careful alignment and safety checks.
- Select a laser source with the right power and wavelength for your needs. Most fiber lasers use ytterbium-doped fiber at 1064 nm.
- Mount the laser source securely. Align it precisely with the beam delivery system to maintain beam quality.
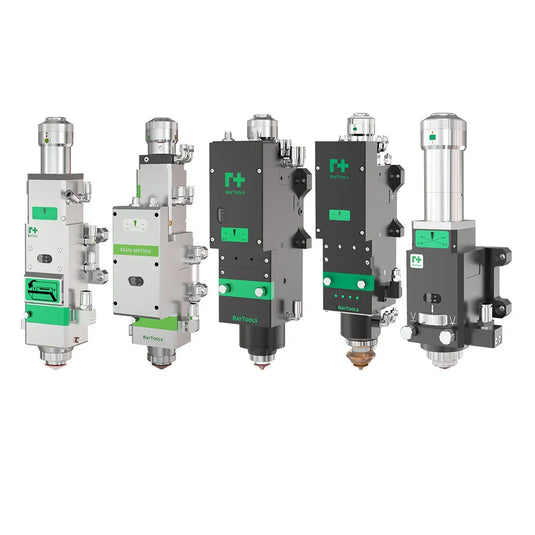
- Choose a cutting head that matches your laser power and application. Auto-focusing heads, such as the BS03K, offer high precision.
- Use high-quality optical components to keep the beam strong and focused.
- Connect the water chiller and gas assist system. These support cooling and cutting quality.
- Make sure the frame is rigid and stable to prevent vibration.
- Assemble and align all parts carefully. Start testing at low power to check for reliable operation.
- Always wear laser safety eyewear and use a machine enclosure with laser-resistant materials.
- Set up ventilation or fume extraction to handle hazardous fumes.
Safety Alert: Never operate the laser without proper eyewear and shielding. Follow all safety checklists from Pendstar Laser’s guides.
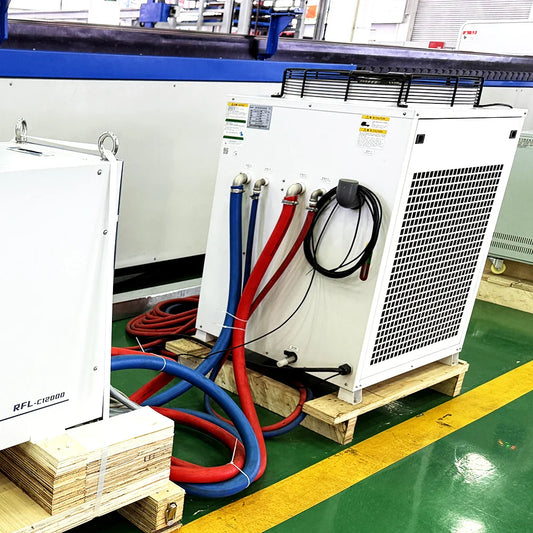
Cooling and Gas Systems

Proper cooling and gas systems keep your machine running smoothly and safely. Here’s what you need to know:
- Use a closed-loop water chiller for high-power lasers. This system circulates temperature-controlled water to remove heat efficiently.
- Check coolant levels and filter cleanliness regularly. Clean fans and heat exchangers to maintain performance.
- Set up an air compressor and gas supply system. Oxygen and nitrogen help remove molten metal and improve cut quality.
- Adjust gas pressure to match your material and thickness.
- Install a dust and fume extractor to keep the air clean.
- Use a voltage stabilizer to protect sensitive electronics from power surges.
| Cooling System Type | Description | Advantages | Limitations |
|---|---|---|---|
| Air-Cooled | Uses fans to blow air over hot parts. Good for small or low-power lasers. | Simple, low cost, easy to maintain. | Not efficient for high-power lasers. |
| Water-Cooled | Circulates water to absorb and remove heat. Best for high-power lasers. | Very efficient, supports long-term stable use. | Needs regular maintenance and checks. |
Tip: Never skip cooling system checks. Overheating can damage your laser and reduce its lifespan.
Electrical Wiring
Wiring connects all the parts of your fiber laser cutter. Safe and correct wiring is essential for reliable operation.
- Inspect all wires, plugs, and connections for damage before installation.
- Make sure all electrical equipment meets safety standards.
- Install the machine on a stable surface. Secure all components in place.
- Connect all cables, including power and cooling system lines, according to the wiring diagram from Pendstar Laser.
- Double-check that every connection is tight and in good condition.
- Always unplug the machine before cleaning, maintenance, or adjustments.
- Follow the operation manual and safety guidelines closely.
Note: Pendstar Laser provides detailed wiring diagrams and technical support. Use these resources to avoid mistakes.
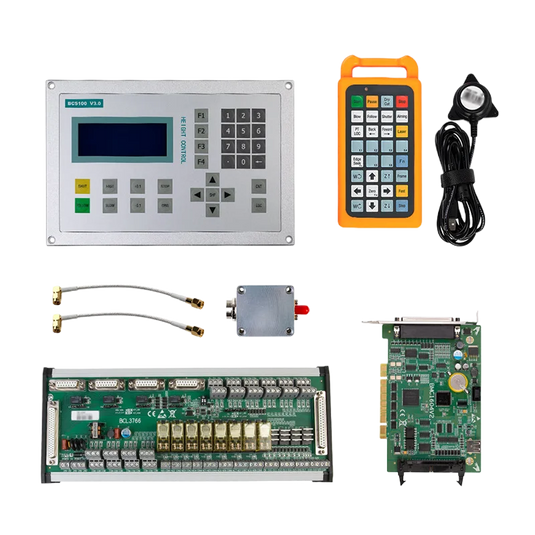
Software and Control Setup

The final step is to set up the software and control system. This allows you to design, control, and monitor your cutting jobs.
Controller Types:
Raytools XC Series
- XC3000S – Optimized for 1.5-3kW flat-sheet cutters
- XC3000Plus – Designed for 6kW flat-sheet cutters
- XC6000 – Tailored for 12kW flat-sheet cutters
- AX 3000T – Designed for sheet & tube combo cutters, providing versatile functionality
Fscut Series
- Fscut 2000E – Suitable for 1.5-3kW flat-sheet cutters
- Fscut 4000E – Designed for 6kW flat-sheet cutters
- Fscut 8000E – Tailored for 12-30kW flat-sheet cutter
- Fscut 3000DE-M – Designed for sheet & tube combo cutters, offering comprehensive functionality
By following these steps, you can build a fiber laser cutting machine step by step and achieve professional results. Always use the checklists and resources provided by Pendstar Laser to ensure safety and quality at every stage.
Calibration and Testing
Initial Power-Up
You need to power up your fiber laser cutter for the first time with care. Follow these steps to ensure a safe and smooth start:
- Remove all crate bolts and panels from your machine.
- Gather attachments like the air pump, water pump, pipes, cables, and manuals.
- Move the machine to its final workspace.
- Install the ventilation system, water cooling with reservoir and pump, and pressurized air supply.
- Secure the water reservoir and mount the air pump on rubber brackets.
- Connect water feed and return pipes, sealing all joints.
- Support return pipes to prevent accidental disconnection.
- Install ventilation tubes using clips and supports.
- Check all connections, cables, and pipes for obstructions or leftover packing.
- Make sure all power switches are off before plugging in.
- Power on the machine and listen for unusual noises.
- Inspect fans, move the laser head manually, and test the air compressor and water cooling system.
- Confirm water circulation and air assist at the laser head.
⚡ Tip: Always double-check for leaks and loose wires before powering up.
Laser Alignment
Precise laser alignment ensures your machine cuts accurately. Adjust the focus based on your material’s thickness and type. Regularly check and realign the laser beam with the cutting head. This practice helps you maintain high cutting performance and reduces wear on your machine.
Software Configuration
You must set up your software for optimal performance. Start by configuring key parameters:
- Set laser power, cutting speed, and assist gas pressure for your material.
- Monitor and adjust these settings to keep cut quality consistent.
- Align the laser beam and clean the focusing lens.
- Use diagnostic tools to check beam quality.
- Try advanced features like automatic focus and dynamic beam control.
- Choose and maintain the right nozzle for your material.
- Use high-quality assist gases and adjust flow rates.
- Schedule routine maintenance and calibration.
🛠️ Note: Collect data after each cut and use it to refine your settings for better results.
Test Cuts
You need to run test cuts to check your machine’s calibration. Evaluate each cut using these metrics:
- Edge Quality: Look for smooth edges with minimal burrs or dross.
- Dimensional Accuracy: Measure the cut to ensure it matches your design.
- Kerf Width: Check that the width of the cut is consistent.
- Geometry: Confirm the shape is correct with little distortion.
Following ISO 9013:2002 standards helps you achieve precise, repeatable results. Adjust your settings as needed until you see clean, accurate cuts every time.
Upgrades and Maintenance
System Upgrades
You can boost your fiber laser cutter’s performance by adding smart upgrades. Many users choose dual-platform exchange tables. These let you cut one sheet while loading another, so your machine never stops. Auto loading and unloading systems also help. They move materials in and out without you lifting a finger, which saves time and labor.
Here is a table showing popular upgrade features and their benefits:
| Upgrade Feature | Description | Performance Impact |
|---|---|---|
| Improved Dynamic Power Control (DPC) | Adjusts power and speed during cutting, especially at corners. | Gives cleaner edges and reduces heat damage. |
| Precision Pierce | Makes piercing faster and cleaner, even on thick materials. | Increases consumable life and lets you cut smaller features. |
| Enhanced Height Sensing | Tracks wavy or thin materials better. | Improves cut quality by about 20% on tricky surfaces. |
| High Speed Nozzle | Cuts faster, especially with nitrogen gas. | Doubles speed on some materials and handles thicker sheets. |
💡 Tip: Upgrading your system can help you cut more materials, save time, and get better results.
Routine Maintenance
You keep your machine running smoothly by following a regular maintenance schedule. Start each day by cleaning the exterior and checking gas pressures. Inspect zero points, limit switches, and screws on the axes. Make sure the water level and lines are correct. Test the X and Y axes for smooth movement.
Follow these steps for best results:
- Clean rails and sliders, then lubricate with gear oil.
- Inspect motors, gearboxes, and couplings for dirt or damage.
- Check the cutting head position and nozzle wear before starting.
- Clean the nozzle every hour and replace it every few months.
- Monitor cooling water pressure and temperature daily.
- Clean the water tank weekly and replace the water.
- Clean dust from the exhaust fan often.
- In winter, keep the room above freezing and use antifreeze.
- Keep a maintenance log and follow the manufacturer’s manual.
🛠️ Regular care prevents breakdowns, keeps your cuts precise, and extends your machine’s life.
Troubleshooting
You may face issues like uneven cuts, power drops, or software errors. Here are common problems and how to fix them:
- If you see uneven cuts, check laser alignment and clean the optics.
- For power issues, inspect the power supply and wiring.
- If the software glitches, update it and check the control panel.
- When the machine overheats, check the cooling system and water flow.
- If you notice sparks or strange noises, stop and inspect for loose or damaged parts.
🚨 Always address problems early. Quick fixes and regular checks help you avoid costly repairs and downtime.
You can build a fiber laser cutting machine step by step and unlock many advantages. Users report faster order fulfillment, lower costs, and the ability to cut complex shapes with high precision. Always plan carefully, follow safety checks, and maintain your machine. Take advantage of Pendstar Laser’s free guides and technical support.
Remember: Consistent safety practices and ongoing upgrades keep your machine efficient and your business competitive.
FAQ
How do you choose the right laser power for your projects?
You should match the laser power to the thickness and type of metal you want to cut. For thin sheets, 1500W works well. For thicker materials, select 3000W or 6000W. Always check the material chart before you decide.
What safety gear do you need when building or using a fiber laser cutter?
You must wear laser safety glasses, heat-resistant gloves, and a mask. Use protective clothing and keep a fire extinguisher nearby. Good ventilation helps protect your lungs from fumes.
Can you upgrade your fiber laser cutter later?
Yes, you can add features like auto-focus heads, exchange tables, or better software. Pendstar Laser offers support and guides for upgrades. Upgrading helps you cut more materials and improve speed.
How do you maintain your fiber laser cutter for best results?
Clean the optics, check the cooling system, and inspect the wiring every week. Replace nozzles and filters as needed. Keep a maintenance log to track your work and spot problems early.